HDR using Photomatix - Page 3
by Honez
Table of Contents
Page 1: Photomatix HDR: Steps 1-3. Page 2: Photomatix HDR: Steps 3-4. Page 3: Photomatix HDR: Steps 4 continued.. Page 4: Photomatix HDR: Steps 4 continued..'Luminosity' boosts shadow details and overall image brightness. I usually like to crank this up a little to see what's hiding in the shadows. 'Black Point' and 'White Point' set the high and low clipping levels in the image. Again, I tweaked them slightly from the default. The 'Gamma' slider works in conjunction with 'Luminosity' and 'Black Point' and 'White Point' levels, controlling the middle range tones. I tend to end up playing with all four of these sliders at the same time until I get the right balance.
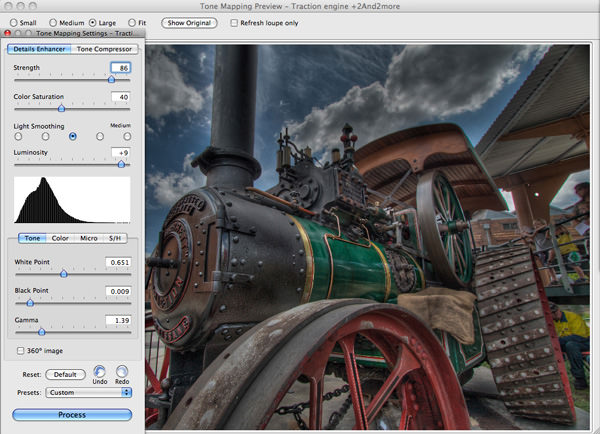
Next are the 'Color' tab options. 'Temperature' is the usual blue to the left, red to the right. I wanted to bring out the color of the wood and the red wheels, so I went a little towards the red end. Highlight and shadow saturation can be set independently, as well as globally on the Tone tab. I boosted the shadows a fair bit here.

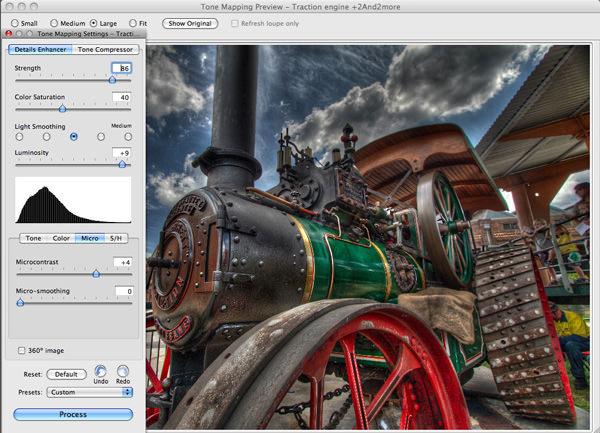
The 'Micro' tab options control the contrast level of local details. The closest Photoshop equivalents I can think of to these are sharpening and noise reduction.
Boosting the 'Microcontrast' level sharpens things up, and 'Micro-smoothing' controls noise reduction.
The terms aren't exactly interchangeable, because the effect on the HDR image isn't the same as it would be in Photoshop.
It's hard to describe how they differ, just that they do things a little differently.
In my example I added some microcontrast to bring out the texture on the black part of the boiler.
<-previous page | 1 | 2 | 3 | 4 | next page->
You can get a 15% discount on Photomatix Pro software. Just put 'GeoffLawrence' (without the quotes) into the coupon box when you make your purchase. There is also a free trial version that you can download on their website.
Introduction page.
Scaling your files.
Balancing those pixels.
Dealing with color casts.
An introduction to Adobe Camera RAW.
Advanced use of Adobe Camera RAW.
Using the unsharp mask.
Masking parts of your picture to edit certain areas.
How to build accurate layer masks.
A must for landscape and building photographers.
Using layers in Photoshop.
How to make a better job of changing images from color to black & white.
Playing with contrast and tones to give a more dramatic effect.
How to shoot and process HDR pictures with Photomatix Pro software.
If you enjoyed this page you might
be interested in my eBook
Learn Photography with Geoff Lawrence