Focus Stacking - by Kev Vincent
Table of Contents
1. The Focus Rail 2. Focusing Method 3. Post Processing & Stacking Software 4. Using Photoshop CS4/5 5. ConclusionTaking a series of pictures at different distances from the subject (without altering the lens focus distance) and stacking them together, will dramatically increase the Depth of Field on your close-up shots.
Focus stacking allows us to blend together a set of images that all have slightly different focus points, enabling us to cover a much larger range of depth of field than a single shot. Moreover, it enables us to shoot each individual image at a more optimal aperture, ie: f8, so that diffraction never becomes an issue.
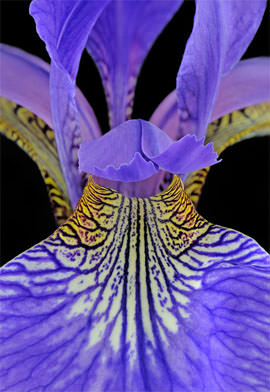
Focus stacking is very well suited to macro 1:1 and close-up work where the regular depth of field is extremely thin. At macro 1:1 distance, using a 100mm lens, even at f16, the DOF is only about 1mm. Stacking not only allows us to obtain a much greater depth of field, but also one can choose (to a degree) where in the frame the DOF will actually be enhanced. For example, on my Blood Iris shot shown here, the stacked region is only the front patterned area of the flower, with the background left blurred and completely untouched.
My personal approach to focus stacking is really the same as it would be for any other macro or close-up shot. All the essential accessories are involved (ie: tripod, geared head, focus rail, shutter release, etc.) with the focus rail now playing the major role. Here's a link to my tutorial Macro 1:1 for a short overview on the topic which incorporates many of the same basic elements, application techniques, and strategy.
The Focus Rail
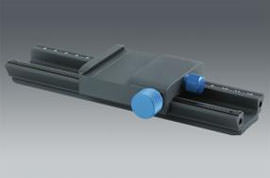
The focus rail unit (my Novoflex Castel-Q which is shown in the pic) simply allows the entire camera/lens combo to be moved, back and forth, in small, smooth, incremental steps, thus enabling one to slightly shift the focus point from front to back (or vice-versa) with each separate image. Focus rails have travel-measurement markings, just like a ruler, so that one can carefully adjust each individual take in an accurate and exact manner.
The main thing to look for in a rail is a solid, strong construction and a smooth motion that is free from wobble or jumpy, erratic movement. Ideally, you want the main adjustment knob to be very responsive and to move the camera along in an easy, gradual manner, without any slack or kickback return in the knob mechanism itself. You really don't want to get a perfect focus set, only then to have the unit move even slightly when you take your finger off the knob, because that sharp focus you just dialed in will now be lost. There are a number of focus rail systems on the market these days (including Velbon, Manfrotto, RRS, Kirk, Novoflex) and they range in prices from quite cheap to moderately expensive. As with any photography accessory today, don't expect top quality for much under $500. My Novoflex Castel-Q cost me $438 here in Canada, which included the necessary Q-Plate (quick release) for the Nikon bodies.

I don't think that it matters if one shoots their set of images from back to front, or the other way around so long as ALL the desired region is adequately covered. I've experimented with both methods and haven't noticed any difference in the end result. It is worth noting though that it's important to make sure that each separate shot is spaced the same distance apart to ensure the best quality final stack. For example, let's say that I want to capture a total DOF of 10mm in ten images at a ratio of 1:1 using f16, then in theory each shot should be taken 1mm apart (ie: forward or backward) on the rail to avoid what I call the smoothies, which are regions of the image that, after being blended, show no detail. This has occurred because the frame overlap was not sufficient, so some areas were not in focus. Clicking on the image on the right (which is a 100% crop) will take you to a larger photo that I created to illustrate the smooth areas where detail has been lost.
Obviously, being very meticulous and precision minded is key here, although after a bit of practice, I do think that one gets a good 'feel' for the process, and perhaps doesn't rely quite so much on specific measurements. I guess it's kinda like driving a car, after a while you just intuitively know how to do it.
One can fix these problem areas quite effectively by using the Photoshop clone tool to copy detail from nearby regions, which is relatively quick and easy to do. Also note that these smoothie regions are often not noticeable when the image is viewed on a PC monitor at regular (33%) ratio and perhaps would be OK/fine if printed up to a standard size. However, if print enlargements are required then I think the image quality could certainly be compromised.
Focusing method
One point that people often ask me about is the actual focusing method. Does one always move the entire camera system back & forth along the rail to vary the frame focus points, or can it be simply done by turning the lens barrel, as with a normal shot? Well, I don't think that it truly matters from a technical standpoint as both methods actually change the visual perspective of each image, that is to say the framing of each picture will be slightly different.
However, using the focus rail is better because there is no actual touching of the lens itself – which therefore eliminates the potential for any hand-release focus kickback. In short, it's far more precise (and easier) to obtain a tack sharp image when not physically touching the lens at all. Especially when shooting in LIVE View and tethered up to your computer LCD screen. The best approach is to just set the desired ratio (ie: 1:1, 1:2, 1:4 or whatever) on the lens, and then simply move the entire rig along the rail to vary your focus.
Please note – When shooting stacks, compose the frame so that there is ample border space to allow for some final cropping once the images have been blended as there will invariably be some outer border misalignment and areas that need to be removed. This is due to the slight visual perspective differences between each photo. So be warned - always remember to shoot with this in mind. There's nothing worse, after you have taken the time to setup a great subject, carefully getting the lighting absolutely perfect, meticulously taking a series of images, to suddenly realize (once you've disassembled the whole thing) that you didn't leave enough edge room for some cropping to be done and that the final composition now looks dreadful.
Post Processing & Stacking Software
After a series of images have been taken, we need to edit and process them before they are loaded into the stacking software. All the separate images should be of equal exposure, luminosity-balance, and sharpness to maintain an even result. I edit each file accordingly in Capture NX2 and then make a TIFF copy for stacking in Photoshop.

Here is a seven image stack of a pink Rhododendron close-up. The first shot is focused on the water droplet at the front and then working gradually to the back in equal measurements. Click on the photo set to see a much larger view which shows the very slight focus point change between each individual take. At this distance the differences will be very small, but once combined into a single picture will show a much greater depth of field than any one shot alone. On this one I used an aperture setting of f22 to maximize the DOF overlap to ensure that everything from the front to back was sharp. This is the finished stacked image Pink Rhododendron
There are a few stand alone stacking software programs available. The three most popular seem to be: Helicon Focus, Zerene Stacker, Combine ZM, also there is Photoshop CS4/CS5 which includes focus stacking as one of it's standard on-board functions. At present I am using mostly Zerene Stacker, simply because I seem to get better results with it and I find it very easy to work with. I'm not really advocating one particular program over another as I've read various reviews from people who seem to get very good images from the other software listed above. However, I have also tried them and for some reason have had rather mixed, inferior results, which was surprising as I'd read otherwise. Zerene Stacker seems to align & blend my stacks considerably better and also with a lot more consistency – so for the time being I'm sticking with it.
I always prefer to use TIFFs over jpegs for obvious image quality related reasons and so, software resource capability becomes a limiting factor when using the much larger TIFF files. Photoshop CS4 will comfortably handle 5-6 TIFF images together just fine, but when that number increases to more, than say, 10-12 images, then it really starts to puff and has a hard time processing the combined heavy workload. I have been informed that CS4 performs a lot better in this regard when running on the latest 64-bit platform, but with 32-bit it does seem to be limited. One can always use smaller JPEG files to help speed things up should this become an issue but, if you are going to use TIFFs for your stack, I would recommend that you try and limit it to around 6-8 images maximum. By comparison, even on a 32-bit system, Zerene Stacker can process up to 40-50 TIFF files together in one stack with no problem.
Using Photoshop CS4/5
To load your stack into CS4, launch Bridge, select the individual pictures, and go to Tools>Photoshop>Load Files into Photoshop Layers. Or, simply in PS go to File>Scripts >Load Files into Stack>Browse Files>OK. Then once the images are in Photoshop select all image layers (ie: highlight them in the layers pallet on the right) and go to Edit>Auto-Align Layers>OK. Once the pics are aligned, then the second step is Edit>Auto-Blend Layers>Stack Images>OK. Then SAVE the stacked image to TIFF or PSD file. At this stage, I will then crop away any unwanted peripheral misalignment around the edge-border, and also complete any final additional editing that may be required, such as image clean-up, area lightening, mid range dynamics adjustment, selective sharpening, etc.
Note – If you are saving the final stack to TIFF for further editing in Capture NX2, save the file as one single image (without layers) because NX2 will not be able to open a large (layered) TIFF file of more than approx 60MB, or so.
Conclusion
Is focus stacking perfect? Answer – no it isn't as there are still limitations to what can be achieved and stacking software is not technically up to that kind of level yet. It can also be a lot of extra work, time and effort. Having said that, it does allow us to create enhanced DOF images that are just not possible via the traditional DSLR route, with stunning results.
Here is the link to Kev Vincent's photo gallery of stacked images
A few tips for the budding wildlife photographer.
Lighting and perspective.
What you need and what to watch out for.
For perfectionists.
All the settings you need.
Photograph flowers like a professional, what you need to know.
For when you need extra depth of field.
How to get those ultra close-ups in focus.
Shooting a panned sequence of shots and stitching them together to make a panorama.
Techniques to help you capture those golden moments.
Getting the exposure right in all that white.
Tips on how to capture fast action.
Take better holiday photos without losing your sanity.
A complete 'how to' for weddings, with an accent on crowd control.
Bribing people to sit for you.
If you enjoyed this page you might
be interested in my eBook
Learn Photography with Geoff Lawrence