The Inverse Square Law
What it means to Photographers
Although to a physicist the inverse square law covers any kind of radiation, as photographers we are interested in what we can see. So you could consider our version as being the inverse square law of light.
It's useful to know a little about the Inverse Square Law especially when using flash or studio lights. Basically all the inverse square law says is that an object that is twice the distance from a point source of light will receive a quarter of the illumination. So what it means to us photographers is that if you move your subject from three meters away to six meters away, you will need four times the amount of light for the same exposure. This can most easily be achieved by opening the lens aperture two f-stops (see aperture for an explanation) or using a flashgun that is four times as powerful.
What do we mean by a point source of light? Well in Physics there might be a very strict definition but for our purposes any flashgun or lamp can be considered a point source. The other variable to be aware of is that the law works for 'unfocused' light sources. Light from a laser or other highly focused source will not drop off quite so rapidly.
Common Sense?
Well... yes and no. The reason why the power of the light diminishes so rapidly is not because it 'runs out of energy' or anything like that, but because it spreads and so a smaller and smaller proportion of the light hits the object. Here's a little diagram to illustrate the point.
As you can see from the diagram the beam of light fans out quite quickly and the object furthest from the light receives only a small proportion of the light, most of the beam misses the target.
The more the beam is focused the higher proportion of the light will fall on the object. With a theatrical spotlight for instance which has a very narrow beam, much more light will fall on the object.
In photography though we don't tend to use highly focused beams as they produce a very harsh light, too contrasty for our purposes. So the inverse square law, as a rule of thumb, works very well for us. If you would like to know more about the maths involved try this Wikipedia Article on the Inverse Square Law.
How can you use the Inverse Square Law to improve your photos?
If you are using flash on camera and everything is automatic then you don't need to worry about getting a correct exposure. Except you may 'run out of light' because your flashgun is not powerful enough to cover the distance. When it matters to you is when you have a difference in exposure between objects or people near the camera and those only a few feet further away, as explained below.
If you have read my tutorial on flash photography, you will know that I consider 'flash on camera' as one of the cardinal sins of photography, and it should only be used in extreme emergencies. If your flash, or light source, is off camera or bounced off a wall (see flash photography for and explanation) then you have independent control over the distance from the light to the subject.
Movable Studio Lights
In the studio my lights are often much closer to the subject than my camera. There are two reasons for this, one is to get more light on the subject, the nearer the light is to the subject the more light reaches it, and the other is that the nearer the light is to the subject the less of a 'point source' it will be and so the softer the shadows will be on the subject. This is assuming the light has some kind of a reflector or umbrella attached to it to spread the light out a little, the nearer the light is to the subject, the bigger and more spread out it will appear to be, and therefore the softer the shadows will be (see studio lighting for more details and photos of lighting setups in the studio). High contrast and sharply defined shadows are always the enemy of the photographer and should be minimized whenever possible.
The Inverse Square Law in Action
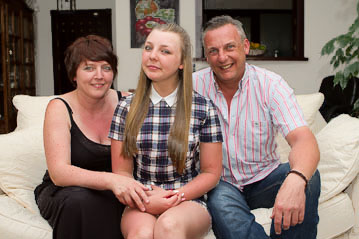
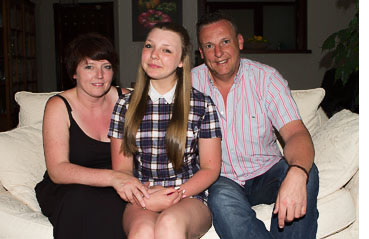
Below are two photographs to illustrate the point. The photo on the left was taken with the flashgun pointing directly at the subjects. As you can see, not only does this produce a very contrasty picture (see contrast) but the, almost white, wall behind them has gone quite dark. In a bigger room this would have been almost black. The photo on the right was taken with the flash pointing at the ceiling, this is called bouncing the flash or bounced flash. The light reflected from the ceiling gives a much more natural and far less contrasty picture, but also notice that the wall behind them is now quite a bit lighter. This is because the difference between distance from the ceiling to the subjects and the distance from the ceiling to the back wall is not so great as the two distances in the photo on the left, where we are looking at the distances from the camera. So, although the wall is still a bit darker, the difference in brightness is not so great, giving a more pleasing photo and one that seems more 'accurate' to us. The other reason that the picture looks more pleasing is that the light is now coming from above, which is what we are most used to both indoors and outside, the hair in particular looks better and is now separated from the background (although dad might argue as he now looks somewhat grayer). You might look at these two pictures and say "Oh yes but the picture on the left is darker anyway". However, if you measure the light on the girl's cheek in each picture you will find they are the same.
|
|
 |
All photographers really need to know about it
When taking straight forward shots, an automatic camera will do all the maths for you so, unless you are using manual exposure, you don't need to worry too much about the details just to get a properly exposed photo. However, the problem arises when you have different elements of your picture at different distances from the camera, then it is very useful though to have some understanding of what is going on so that it doesn't come as a surprise when you see the effects of all this in under or over exposed parts of your photo. Just remember: 'at twice the distance, a quarter of the light reaches the subject'.
If you enjoyed this page you might
be interested in my eBook
Learn Photography with Geoff Lawrence