Table of Contents
1. Get Up Early 2. Zoom in to the Details 3. Be ready to take advantage of Opportunities 4. Contre Jour 5. Night Shots 6. Equipment 7. Planning, planning, planning 8. Family planningTips on Travel Photography
how to take better Holiday Photos
Accepted photography wisdom tells us that we are likely to take our best landscape or cityscape shots within a few miles of where we live. It makes perfect sense of course because, if the weather is not perfect, you can revisit the site at another time of day or in a different season. But how many of us actually do that? I suspect there are a handful of dedicated photographers who will do just that but, for most of us, the pressures of our real lives just don't allow us the time. Also we are not very good at really seeing the things that are so familiar to us, the things we pass every day. How often do you visit a museum in your home town, except when you are entertaining visitors? Yet it's one of the highlights of a visit to the other side of the world.
Holiday time is the one time we all have our cameras at the ready, we're in a strange new place, the sun is shining and we want to record our surroundings and happy memories. It used to be a bit of a cliché in the old days of film that the average 24 or 36 exposure film would have the summer holiday in the middle and Christmas on either end. These were the two annual events that brought the cameras out from their dusty hiding places.
The problem with holiday photography is that you never seem to be in the right place at the right time. There are certain times of day that are better for photography than others. At midday the light is at it's brightest, the color of the light is quite cool and, because the sun is high in the sky, the shadows can be very harsh and awkward to deal with especially when photographing people. We've all taken those shots of faces with panda eyes, where the sun is so bright on the person's forehead, and the eye sockets are completely black. So the first and probably the most valuable piece of advice is:-
Get Up Early
I'm sorry to have to tell you that, when it comes to getting the best shots of scenery, nothing beats getting up early. Yes, even when you're on holiday photography has to be done at the 'right' time of day. For the shot above, taken in Bruges in Belgium, I got up a little early and, while the rest of the party were having a leisurely breakfast, I went for a walk with my camera. This gave me three advantages over trying to get these shots in the middle of the day.
- The light was beautiful, the sun was low in the sky even though it was July, and the color has a distinct warmth to it.
- There are no people around. After ten o'clock this stretch of water would be absolutely littered with sightseeing boats churning up the water.
- I am not feeling guilty about holding up the rest of the party who, although very patient with me, have their own agenda for the day.
The light will have a similar quality in the evening as the sun once again reaches a similar height in the sky, but there will be a lot more people around, which may or may not be a good thing. There are times, such as a visit to the local market, when having lots of people in the shot can be a good thing, but most of the time I find I prefer my street scenes to be less crowded.
Zoom in to the Details
After you have taken the obligatory 'full length' picture of the place you are visiting, put on the long lens and see what details you can pick out. I arrived at the gates to the Forbidden City in Beijing at totally the wrong time of day as you can see, and it doesn't help that there is often quite a bit of smog over the city. I think the picture on the right is much more pleasing, it says China in a nice way and, although obviously not a unique picture, it is not exactly the same as the millions of others that have been taken from that spot.
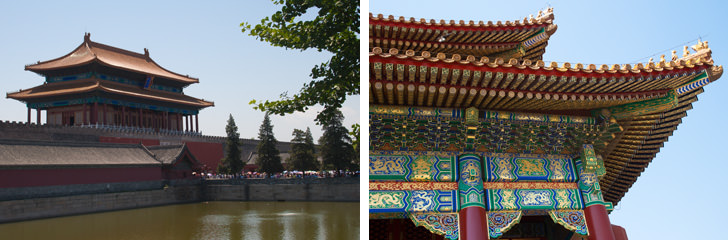
Although I am a very keen photographer, I will often buy a nice postcard or picture book of the places I visit, rather than settle for mediocre pictures of the place. Of course I will still try my best to get my own images but on a tour, the odds are definitely stacked against you getting the ultimate shot of a well know building or view. I think it is much better to try and look for little details that others might have missed.
Be ready to take advantage of Opportunities
These are the gardens just outside the Louvre in Paris. We had just finished a long day looking at the paintings and were walking back to the hotel when we came across a guy feeding the birds. I only had a little point and shoot camera with me but, as it turned out, that was all I needed. Had I brought my DSLR with me I might have been tempted to use a faster shutter speed to freeze the action, but actually I think that what makes this shot interesting is the blur on the wings which helps to convey the frenzy of the moment. By the way this is a straight shot, I have not added any birds in Photoshop, they were really going this crazy. The guy feeding the birds was just to the right of me, I took some shots with him in the picture but prefer this one without him.
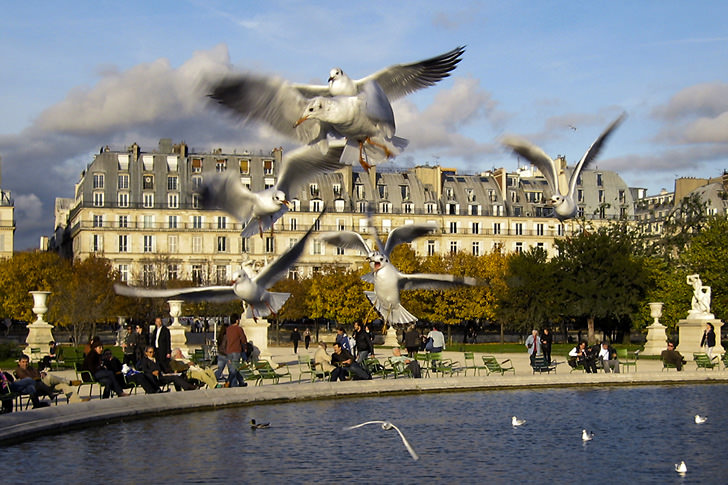
Of course you don't get a shot like this in one take, I took maybe thirty or more shots of the scene from slightly different angles, this was the most pleasing cluster of birds, the group hangs together quite well and makes a sort of circular shape in the middle of the picture. The other nice thing about it is that there are not birds near the edge of the frame which helps to hold the eye in the frame. Once again the time of day was important giving the picture a warm color and accentuating the blue in the sky.
Contre Jour
So far in this tutorial all the pictures have been taken with the sun behind me (except the forbidden city shot which was a bit of a failure). The two pictures below were shot against the light (contre jour) which gives you a completely different effect. This works best when there are some interesting highlights in the picture, like the water in the left picture and the whiskers in the right hand one.

You have to be quite careful when shooting these contre jour pictures because the contrast range is very high and it is not easy to control the light. Sometimes I will take a series of bracketed exposures to make sure I get what I want. The other good thing about contre jour lighting is that the face is in shadow and the lighting in that area is quite flat, it's a good way to avoid panda eyes.
Night Shots

Don't put your camera away after the sun goes down, that's the time when you can get some of your best shots. If you can find something to lean on and have a steady hand, it is perfectly possible to take pictures like these hand-held. You would probably be advised to use a fairly high ISO setting say 1600 ISO and set the exposure compensation to -1 ev or so, maybe even -2ev, because you want the bulk of the picture, which is the sky, to be very dark.
All this leads me neatly on to talking about what you need and don't need to take with you in the way of equipment.
Equipment
It is tempting when you are out and about, especially on holiday, to pack every single piece of equipment you own into your gadget bag, just in case the shot of a lifetime presents itself. In fact I call my big camera bag my justin-case (geddit?). The problem is you soon get completely fed up with carrying so much gear around and pretty soon you find yourself leaving it all behind and taking snaps on your phone instead. Even if you have all your gear with you, you'll never be able to change lenses fast enough to get a shot of that tiger running through the restaurant before it disappears. This may seem to contradict the advice I gave above about changing lenses, well err... that's because it does. I suppose if you are going somewhere that you are never likely to go again, like the forbidden city in Beijing, then there might be a case for taking more than one lens. A better option though, if it is possible, would be to visit the place twice with two different lenses. Taking the family twice would be optional.
If you take your tripod on holiday with you then you are a more dedicated photographer than me. Much as I always bang on about why you should use a tripod, I only ever take mine when I absolutely know I'm going to need it.
Planning, planning, planning
I'll say it again, decide what sort of things you are most likely to see that day and what kind of shots you want to take, put one lens on your camera and leave the rest behind. It's a good exercise to do anyway, it gets you actively looking for shots instead of just trying to react to what is happening around you and failing to keep up. Sure you're going to miss a couple of shots but relax, you're on holiday.
Family planning
You'll notice that I don't have my family standing in the foreground of every shot. That's not because I don't have one or that we take separate holidays, I do sometimes take such photos but not all the time. There's a time for group shots in front of the Eiffel tower, just to prove you were really there, but in my opinion, such shots are unlikely to feature in that Flickr album you're going to create of your greatest travel shots. Besides which my family get very bored with posing for me every five minutes.
Have a nice holiday - Geoff
A few tips for the budding wildlife photographer.
Lighting and perspective.
What you need and what to watch out for.
For perfectionists.
All the settings you need.
Photograph flowers like a professional, what you need to know.
For when you need extra depth of field.
How to get those ultra close-ups in focus.
Shooting a panned sequence of shots and stitching them together to make a panorama.
Techniques to help you capture those golden moments.
Getting the exposure right in all that white.
Tips on how to capture fast action.
Take better holiday photos without losing your sanity.
A complete 'how to' for weddings, with an accent on crowd control.
Bribing people to sit for you.
If you enjoyed this page you might
be interested in my eBook
Learn Photography with Geoff Lawrence