Photographing Buildings
Table of Contents
Page 1: The Right Light, Framing & Perspective Page 2: Night Photography Page 3: Retouching Page 4: FeedbackThe Right Light
If you prefer to go on sightseeing holidays rather than flopping on a beach then you're probably going to want to take photos of the buildings you visit. The trouble is you're always there at the wrong time of day, the light is coming from the wrong direction, there are crowds of people blocking your view and the rest of the family are nagging you to put the camera away and get moving. You could just buy the postcard but, if you are a photography junkie like me, that will never be an option. Although sometimes I might buy a postcard as an insurance policy in case my photos are not good enough.
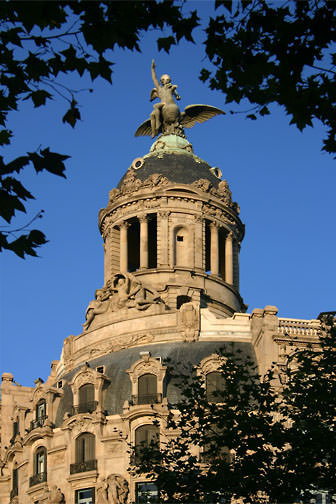
The best time of day to take photos of any outdoor subject is either the early morning or the evening when the sunlight has a reddish hue and the light is coming from the side rather than directly overhead. Early morning is best, there is a difference in the quality of light that I find it hard to put my finger on*, also there are normally less people around. Obviously if you are photographing buildings the best time of day is going to be dictated by which way the building is facing. The photo on the right was taken at about 7.30am, I had spotted the building the day before but the light was all wrong so, as it was close to the hotel where I was staying I decided to go back in the morning.
As with any other type of photography you should ask yourself what it is about this particular building that you like and focus on that. Sometimes this will mean framing the whole building, sometimes it will mean picking out details and sometimes a mixture of both will work well. In the photo above it was the tower on top of the building that caught my eye but I found that I needed at least some of the building to give the tower context.
Framing
When photographing buildings, especially the tops, you often end up with lots of boring sky so a good trick is to frame the top of the building with a branch or two from a nearby tree.
I was quite lucky with this shot the trees were there waiting for me, all I had to do was go and stand in the right place, but I would not be above dropping in a branch from another photo using a bit of Photoshop magic.
Looking around for a tree before you take the photo though will always be more convincing and with zoom lenses it is easy enough to adjust your perspective to fit everything into the right place. It can be hard to get the scale and the lighting just right when you try to put the tree in afterwards.
Getting the perspective right
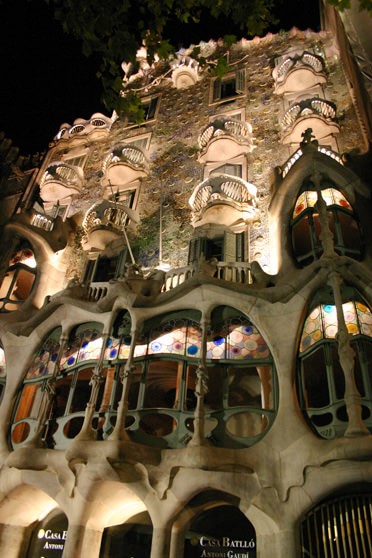
All the photos on this page were taken on a holiday trip to Barcelona where, amongst other delights, we wanted to see the work of the architect Antoni Gaudí. The photo on the left is of a building that was reworked by him in the 1920s. This building is quite difficult to photograph because the trees that line the roadside get in the way. I wanted a shot of the whole facade and the only way I was going to get it, without chopping the tree down, was a drastic tilt of the camera. In this instance the look is quite dramatic and the use of a wide angle lens makes the building look as though it is bending over backwards. Whenever you tilt the lens upwards to get the top of the building into the picture you will notice that the sides of the building converge towards the top and the building appears to be leaning over backwards. In a shot like this one it doesn't really matter but, if you want your buildings to be upright, and personally I hate to see photos of buildings where the verticals are slightly off, then you either have to shoot from a higher vantage point or you need to employ a little trickery.
In the bad old days of film the best option was a special 'anamorphic' or shift lens which would correct the verticals for you. There was also an option to correct the perspective in the darkroom by tilting the enlarger at an angle but in the modern world we use the 'perspective' or 'distort' adjustment in Photoshop to spread out the top of the picture until the verticals are once again vertical.
If you have ever tried to do this to one of your photos and found the adjustment grayed out as unavailable, the probable reason is that you are trying to apply the adjustment to the background layer which will not work. If you double click on the layer in the 'layers' palette you get the option to rename the layer and the default option is 'layer 0' click yes to this and the layer will no longer be the background and all the perspective adjustments will work.
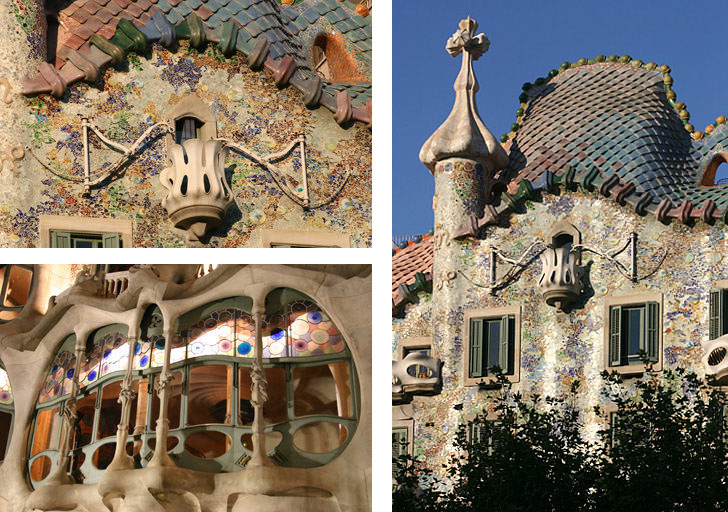
Below are three more photos of the same building, in the shot on the right I have corrected the verticals in Photoshop by stretching out the top of the picture. This seems to work remarkably well considering the program must have to insert pixels into your picture to make up the size. I suppose a purist would not stretch the top but shrink the bottom and then crop the sides.
Normally when I am out and about I carry two zoom lenses, a mid-range which covers approximately 28-80mm (in old fashioned 35mm terms, now 18-55mm) and a 75-300mm telephoto. This covers me from moderate wide angle to about as much telephoto as it is sensible to handle without a tripod. The two pictures on the left are details from the facade showing the 'bits that I like' picked out with the telephoto lens.
*Reader Greg Colby very kindly sent me this explanation of why the light is different at sunrise to sunset.
"The reason why is because of the particulates in the air. In the early morning the particulate matter in the air is more 'neutral' or 'cool' in terms of how it affects the light your camera sees. That is why the sky seems bluer in the morning and whitish mid day. And it is orange-ish in late afternoon for the sunset because all of the particulate has been heated to literally create a more reddish hue to the air in the sky. Also, when the particles are cooler in the morning they are smaller. So the simple answer is the stuff in the air heats up the later it gets :)"
So now you know - thanks Greg.
If you want to get serious about photographing buildings try this book.
A few tips for the budding wildlife photographer.
Lighting and perspective.
What you need and what to watch out for.
For perfectionists.
All the settings you need.
Photograph flowers like a professional, what you need to know.
For when you need extra depth of field.
How to get those ultra close-ups in focus.
Shooting a panned sequence of shots and stitching them together to make a panorama.
Techniques to help you capture those golden moments.
Getting the exposure right in all that white.
Tips on how to capture fast action.
Take better holiday photos without losing your sanity.
A complete 'how to' for weddings, with an accent on crowd control.
Bribing people to sit for you.

If you enjoyed this page you might
be interested in my eBook
Learn Photography with Geoff Lawrence