Using the 'Quick Mask' mode in Photoshop
When you want to edit part of the picture rather than the whole thing, the way to do it is by using the Photoshop Quick Mask mode.
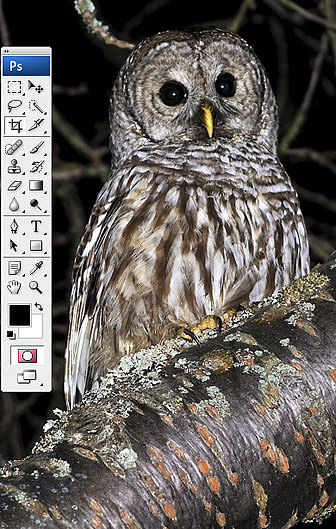
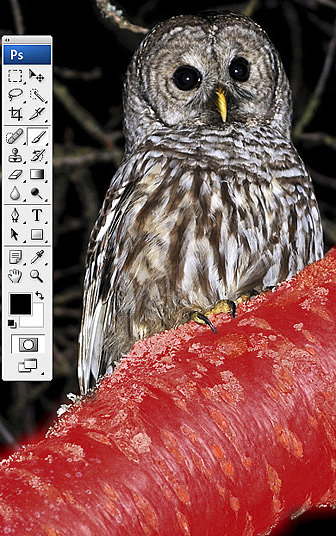
In the picture on the right, used by kind permission of Kev Vincent, a member of our forum, we need to darken down the branch a little to focus our attention on the owl.
The first thing to do is select the area we want to work on using the 'Quick Mask' mode. Near the bottom of the toolbox you can see an icon that looks a bit like a camera, when you click on the icon it turns red to tell you that you are now in 'Quick Mask' mode. The color patches above the icon turn to black and white, even if you had a color selected before. (In versions of Photoshop before CS3 there are two buttons side by side, you click one to go into 'Quick Mask' mode and the other to return.)
The Brush Tool
Select the brush tool and choose a suitable 'brush size' and 'hardness' for the job in hand. The softness or hardness of a brush denotes the size of the fade out at the edge. A brush with 100% hardness will have a sharp edge, 0% hardness will start the fade out from the center of the brush.
Getting the hardness right is very important when retouching photos, you don't want a completely sharp edge, you need to zoom in on the area that you are working on and assess how sharp the edges are that you will be working to. When you zoom in so far that you can see the individual pixels, you will see that even the lines you thought were 100% sharp actually are a little blurred.

Having selected the brush that you want, make sure that the foreground color is black. If it isn't click on the bent arrow just above the color patches to swap the colors over. Then you can start painting the picture. As you paint the area will fill with a translucent red. The reason they use a translucent red is that it is supposed to represent the 'Rubylith' that people used to use in the old black and white darkroom days. Rubylith, a red film, was used to create masks because red light was invisible to the paper.
Although we are masking the bit of the picture we want to work on, it doesn't matter because we can reverse the selection later on. As you can see I have not taken too much care at the edges of the branch. This is because I know we are going to be darkening the area and the area outside the mask is mostly black anyway and so can't get any darker. The only part I have taken care with is around the claws and where the bird and the branch meet.
If you go wrong while you are painting, which you are bound to at some time or other, click the bent arrow to change the foreground to white. Now when you paint the red will be removed.
Introduction page.
Scaling your files.
Balancing those pixels.
Dealing with color casts.
An introduction to Adobe Camera RAW.
Advanced use of Adobe Camera RAW.
Using the unsharp mask.
Masking parts of your picture to edit certain areas.
How to build accurate layer masks.
A must for landscape and building photographers.
Using layers in Photoshop.
How to make a better job of changing images from color to black & white.
Playing with contrast and tones to give a more dramatic effect.
How to shoot and process HDR pictures with Photomatix Pro software.
If you enjoyed this page you might
be interested in my eBook
Learn Photography with Geoff Lawrence