Adobe Camera RAW - using the HSL/Grayscale Tab
by Dan Moughamian - web reproduction rights granted to GeoffLawrence.com
Table of Contents
Page 1: The Hues tab Page 2: The Saturation Tab Page 3: Convert to Grayscale & ACR SettingsHSL (Hue, Saturation and Luminance) is a different way of looking at the colors and tones in our pictures from the more familiar RGB (Red, Green and Blue) model, separating the amount of color and its brightness from the actual color itself. Borrowed from the world of TV and video, it offers new and exciting ways to edit our work. - Geoff
Our first Photoshop CS3 camera RAW tutorial covered the fundamental image correction and editing tasks within the Adobe Camera Raw (ACR) editing environment. We used the Basics panel to tweak white balance, improve specific areas of exposure and contrast, as well as making our images more crisp and vibrant when needed.
This tutorial will focus on some of the creative controls that ACR provides, allowing you to stylize your images without learning complex masking or color channel techniques. The first thing is to click on the HSL / Grayscale panel button.
This will reveal a collection of three tabs, each with 8 slider controls. There is also a 'Convert to Grayscale' button, which we'll discuss later in the tutorial. The 'Default' button (that looks like hot-link text) resets your sliders per tab, undoing any changes made. Keep this in mind as it frees you to experiment without resetting all three sets of sliders, should you make a mistake.
The Hues tab
The first of our HSL tabs focuses on Hues (or regions of specific color). Moving one of the eight hue sliders can (if the hue is present in your image) shift that specific color region to a different but directly related hue. For example you might decide to make an area of green more yellow-green or more blue-green. Or, you may wish to make a region of orange more red-orange or more yellow-orange.
A key point to remember: with Hue sliders, you are changing the color in question, not the color's purity (Saturation) or its brightness (Luminance), which is what we'll talk about next.
To use the Hue sliders, all you need recognize is which colors among the sliders are present in your photograph. Experiment and see what happens! You will find that some sliders produce a very pronounced effect on your image, while others seem to have no effect at all. This is by design. Let's take a look at a few examples.
First we'll move the 'Reds' slider all the way left (-100), to see what happens. Note: -100 does not denote the removal red hues, but rather it applies the “opposite” red hue that would result from moving the slider all the way right (+100). In this case, a pink-red (left) vs. an orange-red (right).

However, because there are no red hues to speak of in this photo, moving the red slider has had no effect on the image at all! Next we'll move the Blues slider to -100 and see what happens.
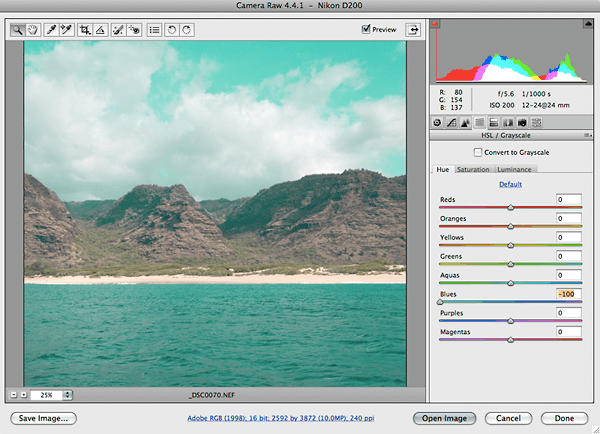
As you might expect, because there are large areas of blue ocean and sky in this photo, moving the 'Blues' slider creates an extremely pronounced effect. So much so that moving the slider to the full -100 value has created a very artificial look.
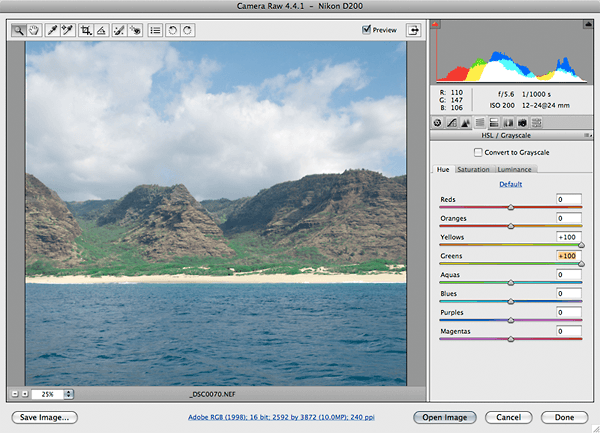
Finally, we can see that moving one or more sliders which correspond to smaller regions of similar color (Greens and Yellows in this case), will have a smaller but visible effect as well. Compare the green areas just beyond the sand, to the same area in the example above....
Introduction page.
Scaling your files.
Balancing those pixels.
Dealing with color casts.
An introduction to Adobe Camera RAW.
Advanced use of Adobe Camera RAW.
Using the unsharp mask.
Masking parts of your picture to edit certain areas.
How to build accurate layer masks.
A must for landscape and building photographers.
Using layers in Photoshop.
How to make a better job of changing images from color to black & white.
Playing with contrast and tones to give a more dramatic effect.
How to shoot and process HDR pictures with Photomatix Pro software.
If you enjoyed this page you might
be interested in my eBook
Learn Photography with Geoff Lawrence