HDR using Photomatix Pro
by Honez
Table of Contents
Page 1: Photomatix HDR: Steps 1-3. Page 2: Photomatix HDR: Steps 3-4. Page 3: Photomatix HDR: Steps 4 continued.. Page 4: Photomatix HDR: Steps 4 continued..Okay, so here's the thing; here I am, happily tinkering
in Photomatix,
when I get an email from Geoff. "Hey honez,"
he says, "you've really been getting into HDR,
how about you write something about your experiences?
It might be fun and kind of interesting to see how
you're getting on." So that's it, my dilemma,
how does a complete HDR noob like me write something
interesting and informative? Well I'm really not sure,
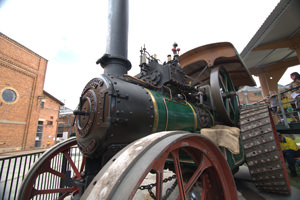
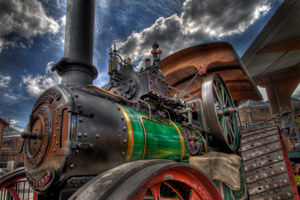
but this tutorial, among other things, shows how I
turned this pretty ordinary photo of a Traction Engine
(left), into what I hope you'll agree is a much better
HDR image (right).
 |
 |
First off, an example; imagine a mountain landscape. It has a nice log cabin in the foreground, flanked by a rugged mountain background, all topped off with a nice fluffy cloud. If I was to whip out my camera to take a photograph, right away I'd have to make some compromises. What's the main subject of the scene? Do I expose to reveal the detail of the cabin? If I do, I'm going to lose the subtleties of that lovely cloud. If I compensate for that, the cabin will look dark and uninviting. I could split the difference and expose for the mountain, but then both the cabin and cloud won't be quite right. And worst of all, none of the shots are going to look like it does right now, to my eyes everything is just peachy as it is, I can see the detail in the cabin shadows and highlights, and in the craggy mountains, and in the cumulus nimbus, all proud and puffed up, looking down on me fiddling with my camera settings.
This is what HDR, High Dynamic Range imaging, is all about. It combines the dynamic range of multiple exposures into one image. Detail normally lost in shadows or washed out in overexposed areas are captured and revealed, better matching what we see with our own eyes. Well, that's the theory at least. Like any process that manipulates digital images, it's subject to interpretation and the whim of the person doing the driving. Some of the things you can do; boosting local contrast, shadow and highlight details, saturation levels, etc, can make the image look too surreal, and images can end up looking like a scene out of Mary Poppins on acid if you're not careful.
The software I use to produce HDR images is the OS X version of Photomatix Pro and Photoshop Elements. I know there are others out in the marketplace, and more “professional” versions of Photoshop can pretty much do all of this out of the box, but I'm going to describe what I do using the software that I'm familiar with.
Step 1
The first thing you need to do to produce an HDR image is, strangely enough, take some images that you're going to convert. Usually, this will be three differently exposed photos of the same thing, so some kind of still life, architecture, landscape or other non-moving subject is the best. Anything with clouds or shiny metallic elements usually come out looking really good, but anything with a large dynamic range should come up nice. It is possible to produce HDR images from a single RAW exposure, manipulated and saved three times at EV 0, -2 and +2, but these never look as good as three exposures done correctly.
The easiest way to get three images to process is to use a tripod, set your camera to 'Aperture Priority' and use 'Auto Exposure Bracketing' (AEB) mode. I've found that setting AEB to be 0, -2 & +2 gives the best results, but technically it should cover as much of the dynamic range in the scene as possible. If your camera supports AEB of more than three exposures and has a greater F-stop range, then go for it. If you don't have a remote shutter-release, then I'd recommend using the self-timer function, and mirror-lockup if possible, to avoid any vibration and potential misalignment of the shots. Another tip I've picked up on is to expose for the shadows in the scene, overexpose rather than underexpose, which generally gives a better final result. Also, select as low an ISO setting as you can, which is ISO 100 on my camera. Any noise in the source images will be amplified by the HDR merging process, so it's a good idea to start with as clean an image as you can.
Step 2
Now you should have three or more images to post-process. I've found that source RAW images work better than JPEG. I won't bore you with the details, but JPEGs, by their nature, have already lost some of the dynamic range you're trying to bring out, so go for RAW if possible.
This part of the process is optional, but I've found that the overall quality of the final result is better if I pre-process the RAW images before I use them. I open each of them up with the Photoshop Elements RAW editor and set all of the correction sliders to zero. I save the image as 8-bits per channel and use those as input to the HDR process. By zeroing the corrections, you can be sure each of the images differ only in their exposure values, which is exactly what you need for HDR processing.

Step 3
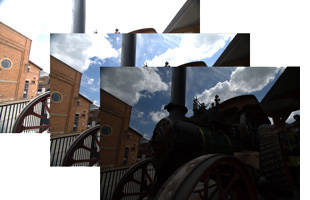
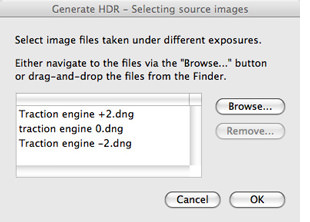
Now I just drag the files, saved in Photoshop Elements as digital negatives (.dng), across into Photomatix Pro.
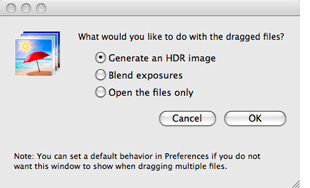
Depending on the effect I'm after, I'll either generate it as an HDR image, or blend the exposures of multiple images.
Exposure blending gives a very natural, photographic, end result and has the benefit of only minimal increase in overall noise. But the “Generate an HDR image” option usually gives a more visually pleasing result, which is what I'm going to select for my traction engine.
Because I dragged and dropped the image files, the file names are pre-populated onto the source image screen, so I just hit OK.
<-previous page | 1 | 2 | 3 | 4 | next page->
You can get a 15% discount on Photomatix Pro software. Just put 'GeoffLawrence' (without the quotes) into the coupon box when you make your purchase. There is also a free trial version that you can download on their website.
Introduction page.
Scaling your files.
Balancing those pixels.
Dealing with color casts.
An introduction to Adobe Camera RAW.
Advanced use of Adobe Camera RAW.
Using the unsharp mask.
Masking parts of your picture to edit certain areas.
How to build accurate layer masks.
A must for landscape and building photographers.
Using layers in Photoshop.
How to make a better job of changing images from color to black & white.
Playing with contrast and tones to give a more dramatic effect.
How to shoot and process HDR pictures with Photomatix Pro software.
If you enjoyed this page you might
be interested in my eBook
Learn Photography with Geoff Lawrence